Open Chords
The first goal of a new guitarist wanting to play most popular music is to build up a chord vocabulary. This is largely a question of teaching the left hand to remember various shapes. It does take some time but the more often you use a particular chord the quicker you will be able to find it and the smoother your playing will sound.
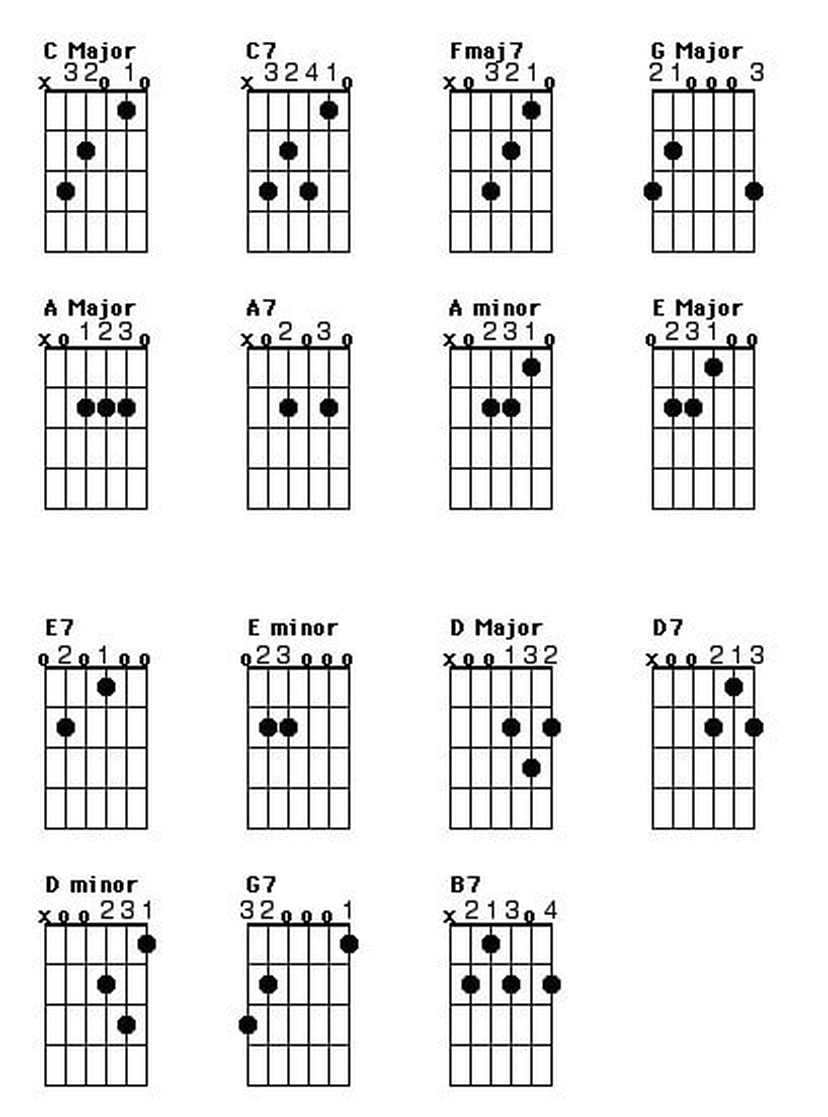
The fifteen chords shown below comprise the beginner’s chord vocabulary. Using these fifteen chords in various combinations make it possible to play simplified arrangements of many popular songs.
Begin by looking carefully at each chord and try to memorize its shape or pattern. Get your fingers into position one at a time and play each string separately to check that all notes are sounding. If a fretted note does not ring properly it will be due to imprecise fingering or insufficient pressure. If an open string does not play it will be due to one of your fingers getting in the way and dampening the string.
A great exercise to help build muscle memory is to place your left hand fingers on the strings for any appropriate chord without pressing down on the strings hard. Pull your left hand off and away from the neck of the guitar a number of times (10 to 15) and replace your fingers in the correct position on the neck for the chord you are practicing. Repeat this exercise another 10 to 15 times while pressing down on the strings and strumming the guitar with your right hand making sure you do get a clean sound from each string. If you need to adjust your fingers to get a clean chord sound do so and repeat from the start.
It takes a minimum of three notes to make a chord. On the guitar it is possible to play chords with six different notes but the chords here have only 3 or 4 notes and some of the notes are repeated.
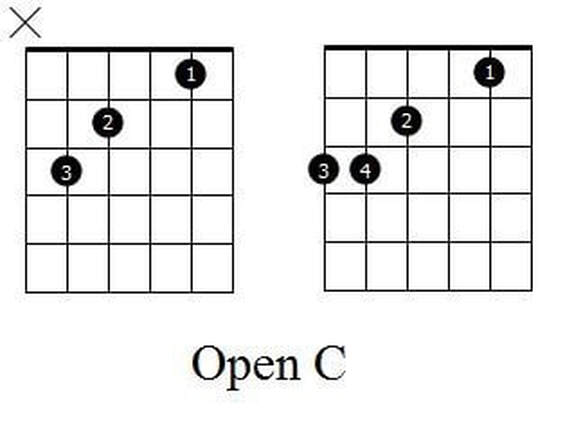
To learn these fifteen basic chords you must understand how to read a chord diagram. These are simply box grids representing the six strings and the frets on the fingerboard. The horizontal lines are frets and the six vertical lines are strings. If a chord is up further frets on the fingerboard a number to the right of the fret will tell you where you are on the fingerboard. These chords are all in "open position", meaning they all start on the first fret. The black dot means that you press your finger down on that string in between the two frets. Open circles at the top indicate "open strings". This means that you pluck or strum these stings but do not press down on them with your left hand. The X on top means that this string is not played. The line farthest to the right represents the 1st string. This is the highest sounding note and the smallest diameter string. The note of the 1st string played "open" is E. Moving left you have B, G, D, A, E. Although the high E is called the first string, standard tuning is usually referred to starting with the sixth string. E A D G B E. I use EAT ALL DAY GET BIG EASY as a saying to help remember the order of the open strings from 6 (top) to 1 (bottom)
Learning these fifteen chords should be your first job. The three E chords are probably the easiest to start with because once you can play E major you only need to pull off one finger to play E7 and Em. C chords and B7 call for more precise fingering if all notes are to sound clearly. To play the F chord, you must hold down the first 2 strings (1 & 2) with your first finger, this is a simple "barre". Your thumb should be directly behind your first finger applying pressure. Shown in the 15 open chords diagram is the Fmaj7 chord which simply doesn't hold down the 1st string (play 1st string open) and is much easier to play at the start.
So, The C chord below is played like this. 1st finger on the second string, 1st fret. Middle finger on the fourth string, second fret and the ring finger on the 5th string, 3rd fret.
The fifteen chords shown below comprise the beginner’s chord vocabulary. Using these fifteen chords in various combinations make it possible to play simplified arrangements of many popular songs.
Begin by looking carefully at each chord and try to memorize its shape or pattern. Get your fingers into position one at a time and play each string separately to check that all notes are sounding. If a fretted note does not ring properly it will be due to imprecise fingering or insufficient pressure. If an open string does not play it will be due to one of your fingers getting in the way and dampening the string.
A great exercise to help build muscle memory is to place your left hand fingers on the strings for any appropriate chord without pressing down on the strings hard. Pull your left hand off and away from the neck of the guitar a number of times (10 to 15) and replace your fingers in the correct position on the neck for the chord you are practicing. Repeat this exercise another 10 to 15 times while pressing down on the strings and strumming the guitar with your right hand making sure you do get a clean sound from each string. If you need to adjust your fingers to get a clean chord sound do so and repeat from the start.
It takes a minimum of three notes to make a chord. On the guitar it is possible to play chords with six different notes but the chords here have only 3 or 4 notes and some of the notes are repeated.
To learn these fifteen basic chords you must understand how to read a chord diagram. These are simply box grids representing the six strings and the frets on the fingerboard. The horizontal lines are frets and the six vertical lines are strings. If a chord is up further frets on the fingerboard a number to the right of the fret will tell you where you are on the fingerboard. These chords are all in "open position", meaning they all start on the first fret. The black dot means that you press your finger down on that string in between the two frets. Open circles at the top indicate "open strings". This means that you pluck or strum these stings but do not press down on them with your left hand. The X on top means that this string is not played. The line farthest to the right represents the 1st string. This is the highest sounding note and the smallest diameter string. The note of the 1st string played "open" is E. Moving left you have B, G, D, A, E. Although the high E is called the first string, standard tuning is usually referred to starting with the sixth string. E A D G B E. I use EAT ALL DAY GET BIG EASY as a saying to help remember the order of the open strings from 6 (top) to 1 (bottom)
Learning these fifteen chords should be your first job. The three E chords are probably the easiest to start with because once you can play E major you only need to pull off one finger to play E7 and Em. C chords and B7 call for more precise fingering if all notes are to sound clearly. To play the F chord, you must hold down the first 2 strings (1 & 2) with your first finger, this is a simple "barre". Your thumb should be directly behind your first finger applying pressure. Shown in the 15 open chords diagram is the Fmaj7 chord which simply doesn't hold down the 1st string (play 1st string open) and is much easier to play at the start.
So, The C chord below is played like this. 1st finger on the second string, 1st fret. Middle finger on the fourth string, second fret and the ring finger on the 5th string, 3rd fret.